
The car is a 1949 Dodge Wayfarer Coupe. one of the last of the true coupes. Dodge made a total of 9000 of these in 1949. I've had the car since 1974, and I recently began a mechanical renovation. After rebuilding the motor, We added a few vintage hotrod goodies. The Fenton dual exhaust headers, Edmunds aluminum dual carburetor intake manifold and Carter Ball carburetors, are all genuine vintage parts. It won't exactly make the car into an asphalt burner, after all, the starting point was 105 hp, but it should sound very cool, and give me maybe a 25% increase in horsepower. You have to admit that if nothing else, it looks great.
Most of the work is being done by Jerry Collins, of Collins Street Rods and Motorcycles, Eugene, OR. 541-683-5998. Jerry began his hot rodding career back in the early postwar (WWII) years, and has a lot of experience with this type of setup. The headers in the photo above were in terrible condition, with the mounting flange broken on one, and the original bolts rusted into the threads, Jerry did a great job of restoring them. We're still looking for an Edmunds finned aluminum head for it, call Jerry if you have one.
This page wasn't planned as a step-by-step description of
the work being done on my Dodge, especially since my original goal with the car was not a
restoration, but just to clean it up a little, and fix the drive train enough to make the
car roadworthy and reliable. However, I've decided to document the process after I took a
quick photo of the exhaust system. Jerry has just finished building the front half
of the system, and hung it on the car. The back half will be built by a local shop,
Eugene Muffler and Brake, that has equipment to do the bends over the rear axle and around
the gas tank, more efficiently than Jerry can do it with his "cut and shut"
process with a hacksaw and welding torch. See below for a picture of the pipes and
mufflers installed. The tailpipes will run next to each other over the rear axle, then
split to opposite sides of the gas tank, and out just inboard of the bumper guards. I like
how he positioned the two glasspacks directly under the heatshield from the original
exhaust system.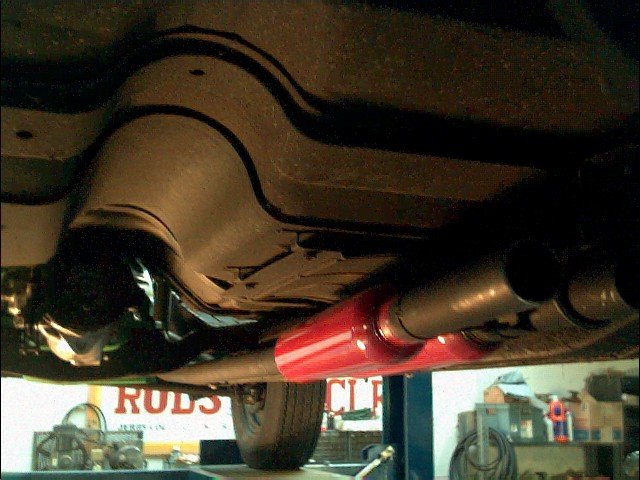
This doesn't do justice to the work that Jerry has done here, and I'm hoping to get a better picture of this later, but for now, this is what I have to offer.
July 16th, last week Jerry got the motor running, and adjusted the carburetors. He propped the battery and radiator up on the frame, so the motor could be started and run. I finally got to hear it with that dual exhaust system installed. Different. Not real loud, although that will change as the glass packing in the mufflers settles. It definately has a high performance tone. The transmission and driveshaft are in also. We're getting very close. I'll be delivering the front fenders to Jerry next week, so he can install them.
August 14th, no new pictures yet, but I got the front fender assembly to Jerry a couple of weeks ago, and Jerry installed them last week. We were all set to drive the car over to the muffler shop to finish the exhaust system, but we discovered a pinhole leak in the gas tank! It didn't appear to be leaking; there was a little varnish on the bottom of the tank that looked like residue from very old seepage. Jerry rubbed it with his finger, and the tank started peeing a little stream of gas! We had to quickly rig up a catchbasin, and slowly removed the drain plug from the bottom of the tank. I thought there was only a gallon or two of gas in the tank, it had been at least 10 years since I filled it up, and Jerry said he only put in a gallon himself when he first fired the motor up. I figured that with gas that was 10 years old, only one gallon added to it wouldn't have been enough to revive much more than maybe two gallons of bad gas. Turned out there was at least 8 gallons in there. Most of which went into the catchbasin. We went to lunch, and came back to find the shop still there, and not too badly filled with gas fumes. Now I need to take the tank out and fix it. We've decided to clean the thing out as best we can, then use some of that motorcycle gas tank liner stuff to cover the bottom of the tank, and hopefully seal in the rust and plug the hole and any others that might appear. I think this is a better solution to welding the holes that we can find from the outside. The other alternative is a replacement gas tank, which I can get, but who's to say that 99% of all the Wayfarer gas tanks inexistence haven't also suffered from residual moisture sitting in them? Why bother? Better to try to neutralize the rust with phosphoric acid, and then cover it up.

Here's a picture taken after Jerry pulled the cylinder head, and painted it red, then added some little chrome acorn covers to the cylinder head bolts. Big difference! According to Jerry, there was a factory performance head available called the Spitfire head that was painted red to distinguish it from the standard head. It raised the compression from 6.5:1 up to 7:1, which in those days was pretty high. That head became standard on the final production flathead engines sometime in the mid 50's. Unfortunately, he didn't mill the head to match the perfomance of the original "redhead".
10/1/01 Well, things got a little slowed down the last few weeks. After the 11th it was a little hard to concentrate on trivial personal stuff. I finally decided that since one of the goals of the madman in Afganistan is to demoralize us and make us quit living our lives, I'd have to just keep doing my thing no matter how inconsequential it seemed after so many lives were lost. Jerry and I pretty much both decided the same thing at the same time. We both got back to our lives, and our jobs, not quite as if nothing had happened, but with the intent that the efforts at demoralizing us be proven a failure.
The result is that I am now proud to announce that my Dodge is back on the road. I still have much work to do, the interior is completely shot, the door and window gaskets need to be replaced, etc. etc etc., but it's running, and it goes and sounds great! Those Carter carburetors need some help. Getting them working right is a challenge. I even took to running hotter plugs on the back half of the engine to compensate for a richer mixture coming out of the rear carb. After much backfiring, stalling, and other adventures, I have it so the car seems to be running pretty well. We were fooled for awhile by a very sooty condition of the plugs that seemed to actually have been caused by the piston rings being slightly stuck. We leaned the mixture out just about the same time the rings started working correctly, so had a slightly lean setting before we figured out that the soot was from oil fouling, although it didn't seem to be as oily as I'd expect.
The first thing I did was go to the tire store and put 4 new tires on the car. The tires that were on it had lots of tread left, but they were about 25 years old, and they felt like solid rubber, not a comfortable (or safe) ride. The new tires look better anyway, I let them put the white stripes (I hesitate to call them "sidewalls") out, and I actually agree with the tire guys, that it does look better that way.
After sitting for over 10 years, the last 5 in a carport without proper weather protection, the paint was somewhoat faded, but the repaint done in 1960 or so is really thick paint, so it takes a polish with heavy-duty simoniz with no problem (other than a lot of work), and it's starting to look really good. I'll post some pictures of the car after I finish rubbing and waxing. I'm also going to get a recording of the car running, it's pretty loud with those little glass packs, but I think a car like that ought to be loud! You'll have an opportunity to hear it soon.
Go see some pictures of the finished product.
Last update was October 29, 2001
Copyright Carl Best, 1997-2001
Click here to go back to where you came from